

How To Make Ultrsonic Sensor Out Put To Lcd
Advertisement
The HC-SR04 is an cheap, easy to use ultrasonic altitude sensor, with a range of 2 to 400 cm. It is commonly used in obstacle avoiding robots and automation projects. In this tutorial, you lot will learn how the sensor works and how to utilize it with Arduino.
I take included 5 examples with a wiring diagram and code so you tin can start experimenting with your sensor. We volition first look at an example that does non apply an Arduino library. Adjacent, I volition testify you how you lot tin can use theNewPing library to create a more meaty code.

Cheap ultrasonic altitude/proximity sensors are great but in some projects, you lot might need a waterproof sensor like the JSN-SR04T or an IR sensor that isn't influenced past temperature changes. In that example, the articles beneath might be useful:
- Waterproof JSN-SR04T Ultrasonic Altitude Sensor with Arduino Tutorial
- How to use a SHARP GP2Y0A21YK0F IR Distance Sensor with Arduino
- How to use a Sharp GP2Y0A710K0F IR Altitude Sensor with Arduino
- MaxBotix MB7389 weather-resistant distance sensor tutorial
- MaxBotix MB1240 ultrasonic altitude sensor Arduino tutorial
Supplies
Hardware components
| | HC-SR04 sensor | × one | Amazon |
 | Arduino Uno Rev3 | × 1 | Amazon |
| Breadboard | × 1 | Amazon | |
| Jumper wires | ~ 10 | Amazon | |
| USB cable type A/B | × 1 | Amazon | |
 | 20×iv character I2C LCD (optional) | × 1 | Amazon |
| DHT11 sensor (optional) | × 1 | Amazon |
Software
Makerguides.com is a participant in the Amazon Services LLC Assembly Plan, an affiliate advertising program designed to provide a means for sites to earn advertisement fees by ad and linking to products on Amazon.com.
How does an ultrasonic distance sensor piece of work?
Ultrasonic sensors piece of work past emitting sound waves with a frequency that is likewise high for a human to hear. These audio waves travel through the air with the speed of sound, roughly 343 chiliad/s. If in that location is an object in front end of the sensor, the sound waves go reflected back and the receiver of the ultrasonic sensor detects them. By measuring how much time passed between sending and receiving the audio waves, the distance between the sensor and the object can exist calculated.
At twenty°C, the speed of sound is roughly 343 m/s or 0.034 cm/µs. Let'south say that the fourth dimension betwixt sending and receiving the sound waves is 2000 microseconds. If you multiply the speed of audio by the time the sound waves traveled, yous get the distance that the audio waves traveled.
Distance = Speed x Fourth dimension
Just that is non the result we are looking for. The altitude between the sensor and the object is really merely half this distance because the sound waves traveled from the sensor to the object and back from the object to the sensor. So you need to divide the result by ii.
Altitude (cm) = Speed of sound (cm/µs) × Time (µs) / 2
And then for the example this becomes:
Distance (cm) = 0.0343 (cm/µs) × 2000 (µs) / two = 34.3 cm
Temperature dependence of the speed of sound
The speed of sound really depends strongly on temperature and to a far bottom caste on the humidity of the air. Wikipedia states that the speed of audio increases with roughly 0.half-dozen m/due south per caste Celsius. For most cases at xx°C y'all can just use 343 m/s merely if y'all want to get more authentic readings, you tin calculate the speed of audio with the following formula:
V (thousand/southward) = 331.3 + (0.606 × T)
V = Speed of sound (m/s)
T = Air Temperature (°C)
This formula doesn't include the humidity since its event on the speed of audio is only very minor.
Beneath you can find a tutorial on how to utilise a DHT11 temperature and humidity sensor to calibrate the speed of sound and get a more accurate distance reading with the HC-SR04.
How the HC-SR04 works
At the front of the HC-SR04 sensor, you lot can discover two silverish cylinders (ultrasonic transducers), one is the transmitter of the sound waves and the other is the receiver. To let the sensor generate a sonic flare-up, y'all need to set the Trig pin high for at least 10 µs. The sensor and then creates an 8 bicycle flare-up of ultrasound at 40 kHz.
This sonic flare-up travels at the speed of sound and bounces dorsum and gets received by the receiver of the sensor. The Echo pivot then outputs the fourth dimension that the sound waves traveled in microseconds.
Y'all can use thepulseIn() role in the Arduino code to read the length of the pulse from the Echo pivot. Later on that, you lot can use the formula mentioned above to summate the distance between the sensor and the object.
HC-SR04 Specifications
| Operating voltage | 5 5 |
| Operating current | 15 mA |
| Frequency | 40 kHz |
| Measuring range | 2 – 400 cm |
| Resolution | 3 mm |
| Measuring bending | xv degrees |
| Trigger input signal | ten µs loftier pulse |
| Toll | Check price |
For more than information you can check out the datasheet below:
Wiring – Connecting HC-SR04 to Arduino UNO
The wiring diagram beneath shows you lot how to connect the HC-SR04 sensor to the Arduino.
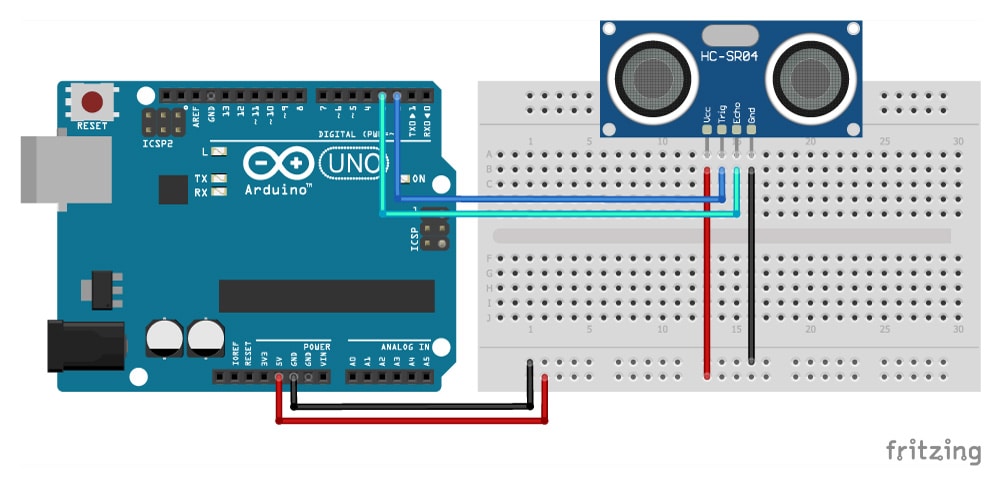
The code examples below use digital pivot ii and 3 for the trigger and echo pivot respectively, but of course you lot tin change this to whatsoever digital pin you want.
HC-SR04 Connections
| HC-SR04 | Arduino |
|---|---|
| VCC | v Five |
| Trig | Pin two |
| Echo | Pin 3 |
| GND | GND |
Example code for HC-SR04 with Arduino
Now that you accept wired up the sensor it is time to connect the Arduino to the computer and upload some code. You lot tin can upload the following example code to your Arduino using the Arduino IDE. Next, I will explain to yous how the lawmaking works.
/* Example code for HC-SR04 ultrasonic distance sensor with Arduino. No library required. More info: https://www.makerguides.com */ // Define Trig and Echo pin: #define trigPin 2 #define echoPin 3 // Define variables: long duration; int altitude; void setup() { // Define inputs and outputs: pinMode(trigPin, OUTPUT); pinMode(echoPin, INPUT); //Brainstorm Serial communication at a baudrate of 9600: Series.begin(9600); } void loop() { // Clear the trigPin by setting it LOW: digitalWrite(trigPin, LOW); delayMicroseconds(5); // Trigger the sensor by setting the trigPin high for 10 microseconds: digitalWrite(trigPin, HIGH); delayMicroseconds(x); digitalWrite(trigPin, Low); // Read the echoPin, pulseIn() returns the duration (length of the pulse) in microseconds: duration = pulseIn(echoPin, High); // Calculate the distance: altitude = elapsing * 0.034 / 2; // Print the distance on the Series Monitor (Ctrl+Shift+M): Series.print("Distance = "); Series.print(altitude); Serial.println(" cm"); delay(50); } How the code works
First, the trigger pivot and the echo pivot are defined. I telephone call themtrigPin andEchoPin. The trigger pin is connected to digital pin 2 and the echo pin to digital pin 3 on the Arduino.
The statement#define is used to requite a name to a constant value. The compiler will replace whatsoever references to this constant with the divers value when the program is compiled. So everywhere you mentiontrigPin, the compiler will supercede it with the value ii when the plan is compiled.
// Ascertain Trig and Echo pin: #define trigPin 2 #define echoPin three
Adjacent I defined two variables:elapsing anddistance. Duration stores the fourth dimension betwixt sending and receiving the sound waves. The altitude variable is used to store the calculated distance.
// Ascertain variables: long elapsing; int distance;
In thesetup(), you get-go past setting the trigPin as an output and the echoPin equally an input. Adjacent you lot initialize serial communication at a baud rate of 9600. Subsequently you will display the measured altitude in the serial monitor, which tin can exist accessed with Ctrl+Shift+G or Tools > Serial Monitor. Make sure the baud rate is also set to 9600 in the serial monitor.
void setup() { // Define inputs and outputs: pinMode(trigPin, OUTPUT); pinMode(echoPin, INPUT); //Begin Serial communication at a baudrate of 9600: Serial.begin(9600); } In theloop(), you trigger the sensor by setting the trigPin Loftier for 10 µs. Note that to go a clean signal you first by clearing the trigPin by setting it LOW for 5 microseconds.
void loop() { // Clear the trigPin by setting information technology LOW: digitalWrite(trigPin, Low); delayMicroseconds(five); // Trigger the sensor by setting the trigPin high for 10 microseconds: digitalWrite(trigPin, HIGH); delayMicroseconds(x); digitalWrite(trigPin, Low); Next, you need to read the length of the pulse sent by the echoPin. I utilise the functionpulseIn() for this. This office waits for the pin to go from LOW to High, starts timing, then waits for the pin to go Low and stops timing.
After that, y'all can calculate the distance by using the formula mentioned in the introduction of this tutorial.
// Read the echoPin, pulseIn() returns the duration (length of the pulse) in microseconds: elapsing = pulseIn(echoPin, Loftier); // Calculate the altitude: distance = duration * 0.034 / ii;
Finally, the calculated distance is printed in the serial monitor.
// Print the distance on the Serial Monitor (Ctrl+Shift+M): Serial.print("Distance = "); Serial.print(distance); Serial.println(" cm"); delay(fifty); } Case lawmaking HC-SR04 with Arduino and NewPing library
TheNewPing library written past Tim Eckel tin can exist used with many ultrasonic distance sensors. The latest version of this library can be downloaded hither on bitbucket.org. You lot might notice that the code below, which uses the NewPing library, is a lot shorter than the lawmaking nosotros used before. Also that, the NewPing library does include some other nice features. It allows you lot to fix a max altitude to read, information technology won't lag for a total second when no echo is received and information technology has a built-in median filter.
Y'all tin install the library by going toSketch > Include Library > Add .ZIP Library in the Arduino IDE.
The library does include some examples that you can use, but y'all volition accept to change them to friction match your hardware setup. I accept included a modified example code beneath that can be used with the same wiring setup as before.
/* HC-SR04 ultrasonic distance sensor with NewPing library instance code. More info: www.world wide web.makerguides.com */ // Include the library: #include <NewPing.h> // Define pins and max distance: #define trigPin 2 #define echoPin 3 #define MAX_DISTANCE 350 // Maximum distance we want to ping for (in centimeters). Maximum sensor altitude is rated at 400-500cm. NewPing sonar(trigPin, echoPin, MAX_DISTANCE); // NewPing setup of pins and maximum distance. bladder duration, altitude; void setup() { Serial.begin(9600); // Open serial monitor at 9600 baud to see ping results. } void loop() { delay(50); // Look 50ms betwixt pings (well-nigh 20 pings/sec). 29ms should be the shortest delay between pings. duration = sonar.ping(); distance = (duration / ii) * 0.0343; Serial.impress("Distance = "); Serial.impress(altitude); // Distance will be 0 when out of fix max range. Serial.println(" cm"); } You tin can also utilizedistance = sonar.ping_cm() ordistance = sonar.ping_in() which returns the measured distance in whole centimeters or inches. With this function yous exercise not demand to take a elapsing measurement and calculate the distance.
Interfacing ultrasonic sensors in 3 pin mode
The NewPing library also makes information technology like shooting fish in a barrel to interface with ultrasonic sensors while using simply 1 I/O pivot. This tin be handy if y'all have very few I/O pins available or if you desire to use a 3 pivot ultrasonic sensor like the Parallax Ping.
To create a 3 pin setup (GND, 5V and SIG) you take to connect both the trigger pin and the echo pin to the same digital pivot on the Arduino. In the code, the only affair you accept to change is line vi-7 and define the same pin for both the trigPin and the echoPin. For example digital pivot 2.
//Define Trig and Repeat pin #ascertain trigPin 2 #define echoPin 2
How to use ping_median() digital filter
The main thing I like about the NewPing library is that it has a born median filter. This filter can greatly improve the accuracy of your HC-SR04 readings. Theping_median() role takes many duration measurements in a row, throws away the out of range readings so averages the remaining ones. By default it will have 5 readings but you can specify how many it should take. Supercede line 19 with below lines.
int iterations = 5; duration = sonar.ping_median(iterations);
Example lawmaking HC-SR04 with I2C LCD and Arduino
To display the measured distance on a 2004 or 1602 I2C LCD, all you take to do is make the following connections and upload the code below. The HC-SR04 sensor is continued in the same fashion every bit earlier.
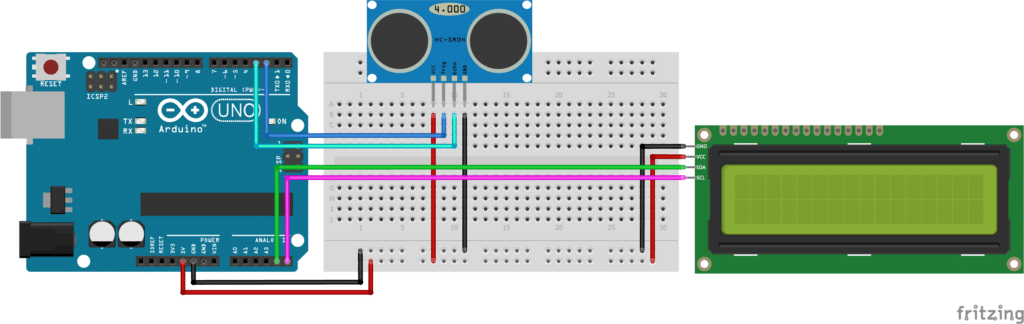
I2C LCD Connections
| I2C LCD | Arduino |
|---|---|
| GND | GND |
| VCC | five Five |
| SDA | A4 |
| SCL | A5 |
If you are non using an Arduino Uno, the SDA and SCL pins can be at a different location. An Arduino UNO with the R3 layout (1.0 pinout), as well has the SDA (data line) and SCL (clock line) pin headers close to the AREF pin. Check the tabular array beneath for more details.
| Lath | SDA | SCL |
|---|---|---|
| Arduino Uno | A4 | A5 |
| Arduino Nano | A4 | A5 |
| Arduino Micro | 2 | 3 |
| Arduino Mega 2560 | 20 | 21 |
| Arduino Leonardo | 2 | 3 |
| Arduino Due | 20 | 21 |
The lawmaking uses theLiquidCrystal_I2C library, which y'all tin download here on GitHub. Make sure that you have this exact library installed! It besides includes theWire.h library, which allows y'all to communicate with I2C devices. This library should come pre-installed with the Arduino IDE.
If y'all desire to acquire more well-nigh how to command a I2C LCD with Arduino, you can check out the full tutorial hither.
- How to control a character I2C LCD with Arduino
/* HC-SR04 ultrasonic distance sensor with Arduino and I2C LCD case lawmaking. More info: https://www.makerguides.com */ // Include the libraries: #include <Wire.h> #include <LiquidCrystal_I2C.h> // Define Trig and Repeat pin: #define trigPin 2 #define echoPin three // Define SDA and SCL pin for LCD: #define SDAPin A4 // Data pin #ascertain SCLPin A5 // Clock pin // Connect to LCD via I2C, default accost 0x27 (A0-A2 non jumpered): LiquidCrystal_I2C lcd = LiquidCrystal_I2C(0x27,20,iv); //Change to (0x27,16,two) for 1602 LCD // Define variables: long duration; int altitude; void setup() { // Ascertain inputs and outputs: pinMode(trigPin, OUTPUT); pinMode(echoPin, INPUT); // Initiate the LCD: lcd.init(); lcd.backlight(); } void loop() { // Clear the trigPin by setting it LOW: digitalWrite(trigPin, Depression); delayMicroseconds(five); // Trigger the sensor by setting the trigPin high for 10 microseconds: digitalWrite(trigPin, Loftier); delayMicroseconds(10); digitalWrite(trigPin, Low); // Read the echoPin. This returns the duration (length of the pulse) in microseconds: duration = pulseIn(echoPin, High); // Calculate the distance: distance = elapsing*0.034/2; // Display the altitude on the LCD: lcd.setCursor(0,0); // Gear up the cursor to column i, line one (counting starts at zero) lcd.print("Distance = "); // Prints string "Display = " on the LCD lcd.print(altitude); // Prints the measured altitude lcd.impress(" cm "); // Prints "cm" on the LCD, extra spaces are needed to articulate previously displayed characters delay(50); } Note that I used a 20 x four LCD display. If you have a different size LCD (16 ten ii is likewise common) yous demand to change line twenty toLiquidCrystal_I2C lcd(0x27,16,2);. If your LCD doesn't have the default I2C address, 0x27, cheque out the complete I2C tutorial where I explicate how you lot can find out what the accost is.
Example code HC-SR04 with DHT11 temperature sensor and Arduino
As mentioned earlier, the speed of audio strongly depends on the air temperature. If you want to measure long distances (3-4 m) it can exist a good idea to add a DHT11 or DHT22 temperature and humidity sensor to your setup. This will permit you to calibrate the speed of sound in real time and thereby increase the accuracy of your measurements.
Adding a DHT11 sensor is really elementary. The wiring diagram below shows you lot which connections y'all need to brand. Note that I am using a DHT11 with a breakout board, so I simply need to wire up 3 pins. Be sure to check the label of the sensor,the society of the pins can be different depending on the manufacturer. The HC-SR04 sensor is continued in the same way as earlier.
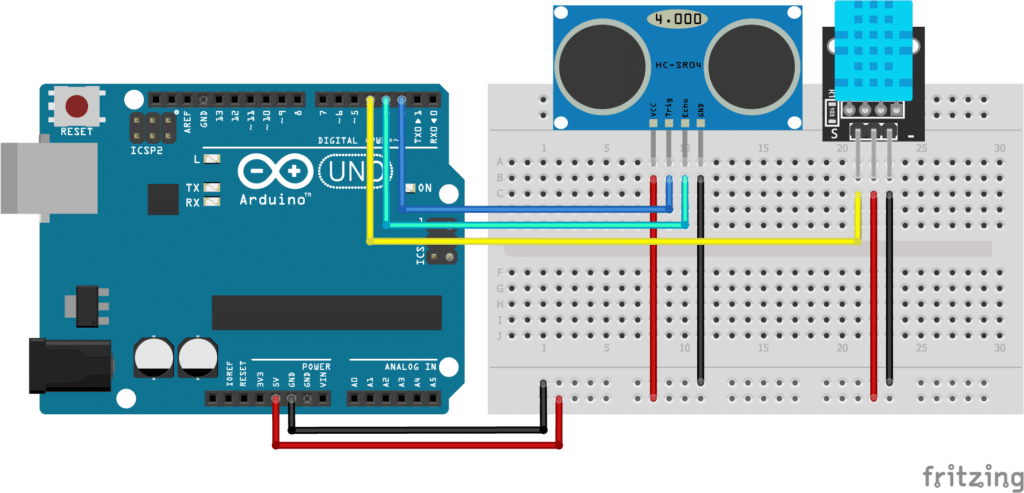
DHT11 Connections
| DHT11 | Arduino |
|---|---|
| VCC (+) | 5 V |
| Signal (s) | Pin 4 |
| GND (-) | GND |
The code below uses theAdafruit DHT Humidity & Temperature Sensorlibrary which you tin download here on GitHub. This library simply works if you as well have theAdafruit_Sensorlibrary installed, which is likewise bachelor on GitHub. Y'all can also download the two libraries by clicking on the buttons beneath:
You lot tin can click the push button in the top correct corner of the code field to copy the code.
/* HC-SR04 ultrasonic distance sensor with DHT11 and Arduino instance code. More info: https://world wide web.makerguides.com */ // Include Adafruit sensor library: #include <Adafruit_Sensor.h> //https://github.com/adafruit/Adafruit_Sensor // Include Adafruit DHT library: #include <DHT.h> //https://github.com/adafruit/DHT-sensor-library // Ascertain Trig pivot, Repeat pin and DHTPin: #ascertain trigPin 2 #ascertain echoPin 3 #define DHTPin iv // Ascertain DHT sensor type: #define DHTType DHT11 // Define variables: long duration; int distance; float speedofsound; // Create a DHT sensor object: DHT dht = DHT(DHTPin,DHTType); void setup() { // Define inputs and outputs: pinMode(trigPin, OUTPUT); pinMode(echoPin, INPUT); dht.begin(); // Begin Serial advice: Series.brainstorm(9600); // Starts the series communication } void loop() { // Articulate the trigPin past setting it LOW: digitalWrite(trigPin, LOW); delayMicroseconds(5); // Trigger the sensor by setting the trigPin high for 10 microseconds: digitalWrite(trigPin, HIGH); delayMicroseconds(10); digitalWrite(trigPin, LOW); // Read the echoPin. This returns the duration (length of the pulse) in microseconds: duration = pulseIn(echoPin, Loftier); // Read the temperature: float temperature = dht.readTemperature(); // Summate speed of sound in m/south: speedofsound = 331.3+(0.606*temperature); // Calculate the altitude in cm: altitude = duration*(speedofsound/10000)/2; // Print the distance and temperature on the Serial Monitor: Serial.print("Temperature = "); Series.print(temperature); Serial.print(" Celsius"); Serial.impress(", Distance = "); Serial.print(distance); Serial.println("cm"); delay(100); } Example code HC-SR04 with DHT11 and I2C LCD
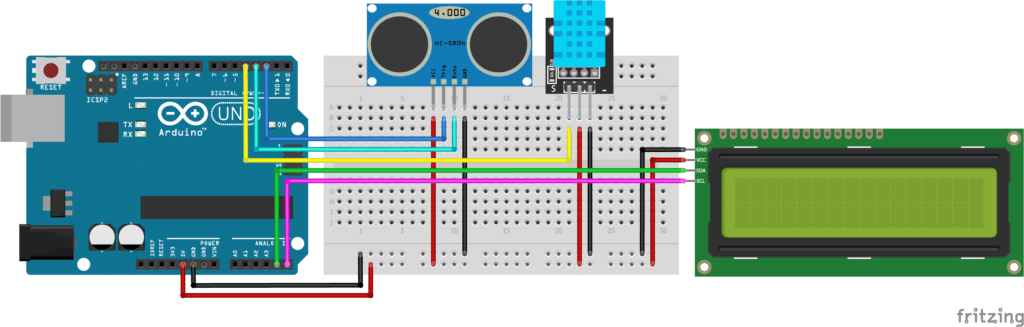
The code below can be used to combine all 3 examples above. It displays both the temperature, the speed of sound and the measured distance on the LCD.
/* HC-SR04 ultrasonic distance sensor with DHT11, I2C LCD and Arduino example lawmaking. More than info: https://world wide web.makerguides.com */ // Include Adafruit sensor library: #include <Adafruit_Sensor.h> // https://github.com/adafruit/Adafruit_Sensor // Include Adafruit DHT library: #include <DHT.h> // https://github.com/adafruit/DHT-sensor-library #include <Wire.h> // Library for I2C communication #include <LiquidCrystal_I2C.h> // Library for LCD // Define Trig pin, Echo pivot and DHTPin: #ascertain trigPin 2 #define echoPin iii #define DHTPin 4 // Ascertain SDA and SCL pin from LCD: #ascertain SDAPin A4 // Data pin #define SCLPin A5 // Clock pin // Connect to LCD via i2c, default address 0x27 (A0-A2 non jumpered): LiquidCrystal_I2C lcd = LiquidCrystal_I2C(0x27,20,iv); // Ascertain DHT sensor blazon: #ascertain DHTType DHT11 // Define variables: long duration; int distance; float speedofsound; // Create a DHT sensor object: DHT dht = DHT(DHTPin,DHTType); void setup() { // Ascertain inputs and outputs: pinMode(trigPin, OUTPUT); pinMode(echoPin, INPUT); dht.brainstorm(); // Initiate the LCD: lcd.init(); lcd.backlight(); // Brainstorm Serial advice at a baudrate of 9600: Serial.begin(9600); } void loop() { // Articulate the trigPin by setting it LOW: digitalWrite(trigPin, Depression); delayMicroseconds(5); // Trigger the sensor past setting the trigPin high for 10 microseconds: digitalWrite(trigPin, High); delayMicroseconds(10); digitalWrite(trigPin, Depression); // Read the echoPin. This returns the duration (length of the pulse) in microseconds: duration = pulseIn(echoPin, High); // Read the temperature: int temperature = dht.readTemperature(); // Summate speed of sound in chiliad/s: speedofsound = 331.3+(0.606*temperature); // Calculate the distance in cm: distance = elapsing*(speedofsound/10000)/two; // Print the distance and temperature on the Serial Monitor: lcd.setCursor(0,0); lcd.print("Temperature: "); lcd.print(temperature); lcd.print(" " "\xDF" "C"); lcd.setCursor(0,1); lcd.impress("Speed: "); lcd.impress(speedofsound); lcd.print(" m/s "); lcd.setCursor(0,two); lcd.print("Altitude: "); lcd.print(distance); lcd.print(" cm "); delay(100); } HC-SR04 Dimensions
Below you tin notice the dimensions of the HC-SR04 ultrasonic sensor. I have noticed that at that place are some small differences between manufacturers, and so I recommend double-checking against your own sensor.
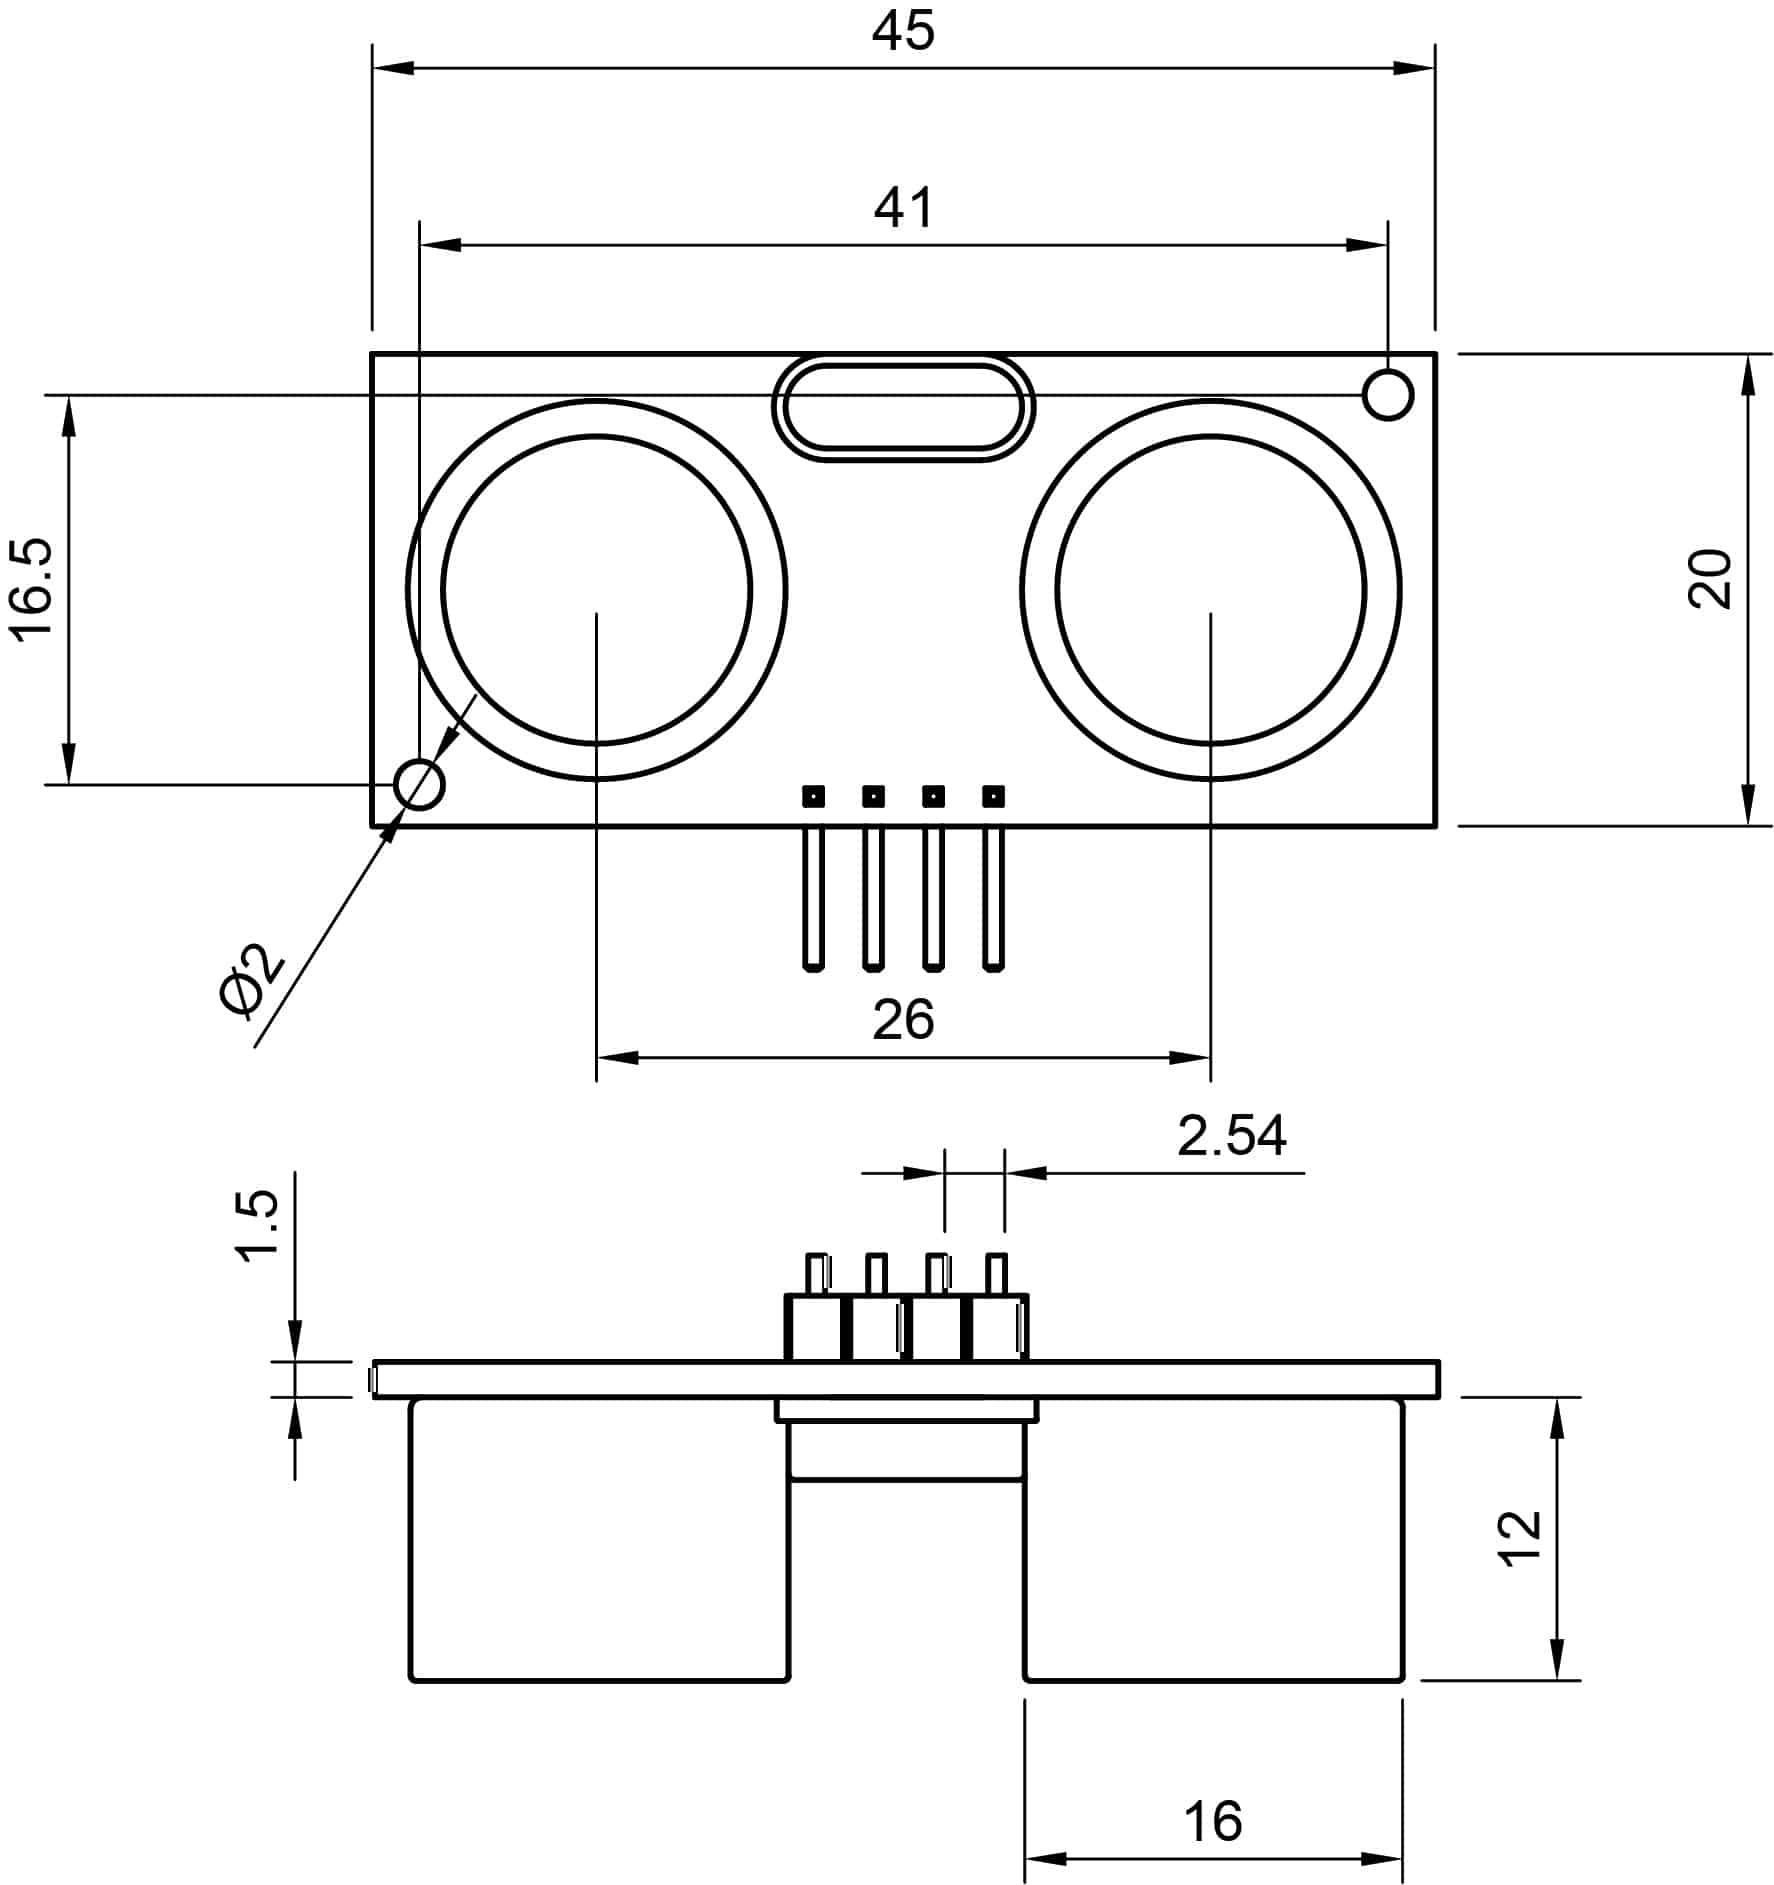
HC-SR04 CAD
I have created bones CAD drawings of the HC-SR04 ultrasonic sensor that you can download beneath.
Conclusion
In this article, I have shown you how the HC-SR04 ultrasonic distance sensor works and how you tin can employ it with Arduino. I hope y'all found it useful and informative. If you did,please share it with a friend that also likes electronics!
Personal projection: A couple of months ago I congenital an interactive wall installation with some friends. We used around thirty ultrasonic altitude sensors to detect people walking in front end of the wall. The wall included lights and sound effects that changed depending on how far away people were standing.

I would dear to know what projects you program on building (or take already built) with the HC-SR04 distance sensor. If you accept whatsoever questions, suggestions or if you think that things are missing in this tutorial,please leave a annotate down below.
Notation that comments are held for moderation to foreclose spam.


Source: https://www.makerguides.com/hc-sr04-arduino-tutorial/
Posted by: chavezonausucan.blogspot.com
0 Response to "How To Make Ultrsonic Sensor Out Put To Lcd"
Post a Comment